Hello everyone,
In this blog post, I want to introduce you to a valuable tool that has been a game changer for me when it comes to managing Nginx proxy hosts. This tool is called Nginx Proxy Manager, and it allows you to easily create, edit, and delete Nginx proxy hosts, as well as control the routing of incoming requests to different backend applications.

Before diving into Nginx Proxy Manager, let’s take a moment to understand what a reverse proxy is. A reverse proxy is a type of proxy server that sits in front of one or more web servers and routes incoming client requests to the appropriate web server based on the requested URL. In other words, it acts as a middleman between clients and web servers and can be used to perform a variety of tasks such as load balancing, SSL/TLS termination, caching, and authentication.
I have been using Nginx Proxy Manager for quite some time now, and I can confidently say that it has made my life as a developer and DevOps Engineer much easier, especially when it comes to protecting endpoints by generating free LetsEncrypt certificates.
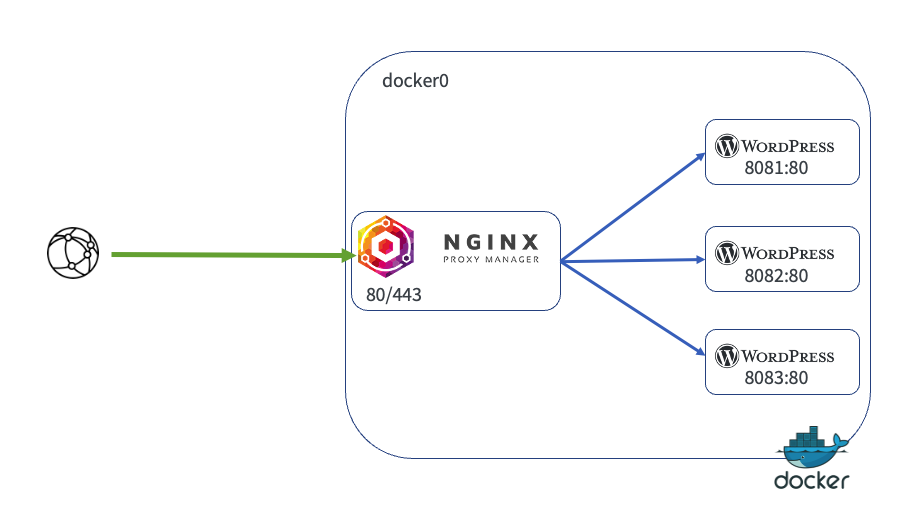
This tool is particularly useful when you have a server that runs multiple docker containers such as Jenkins, multiple WordPress, and Apache containers. It allows you to easily manage and configure Nginx proxy hosts for all of your containers, and route incoming requests to the appropriate container based on the requested URL. This makes it a great solution for running multiple web-based applications on a single server.
Installation
Before we begin, I want to make sure that we’re on the same page. I am assuming that you already have a server set up on which Docker is installed and the ports 80, 81 and 443 are ready to be used.
First, we need to have docker-compose installed, If you don’t have it installed yet, no worries, you can simply run this command in your terminal and it will be ready to go:
sudo apt-get install docker-composeThen create a docker-compose.yml file similar to this:
version: '3'
services:
  app:
    image: 'jc21/nginx-proxy-manager:latest'
    restart: unless-stopped
    ports:
      - '80:80'
      - '81:81'
      - '443:443'
    volumes:
      - ./data:/data
      - ./letsencrypt:/etc/letsencrypt
Execute:
docker-compose up -dThat’s it !
Now that we have Nginx Proxy Manager set up, you should be able to access the Admin UI by going to your server’s IP address on port 81 in your web browser. For example, if your server’s IP address is 192.168.1.100, you would go to http://192.168.1.100:81 in your web browser to access the Admin UI.
docker0
When you install Docker on a host machine, it creates a default bridge network named “docker0”. This bridge network allows containers on the same host to communicate with each other, as well as with the host itself.
Before we can add our first proxy host, we need to find out the IP address of the docker0 network interface on our server. This is the IP address that Nginx Proxy Manager will use to route traffic to our Docker containers.
You can find the IP address of the docker0 interface by running the following command on your server:
ip addr show docker0This command will display information about the docker0 interface, including its IP address. The IP address will be listed next to “inet” and will typically be in the form of 172.17.0.1/16.
It is important to use this IP address when creating your proxy hosts in the Nginx Proxy Manager UI, as it will ensure that traffic is properly routed to the correct container.
Adding the first proxy host
Now that we have found the docker0 IP address, we are ready to add our first proxy host. For the purpose of this guide, let’s assume that we have a WordPress container running a website called “DevNinja” on port 8097. We want to route traffic coming from www.devninja.fr to our WordPress container.
In order for traffic coming from www.devninja.fr to reach our server, we will need to make sure that there is an A record in our DNS settings pointing to our server’s public IP address. This will ensure that when someone types www.devninja.fr into their web browser, their request is directed to our server.
So before testing, please make sure that your DNS A entry is correctly set and point to your server public ip address.
Go to the Nginx Proxy Manager UI.
Go to the “Proxies” tab and click on the “Add Proxy” button.
Fill in the form with the following information:
Hostname: www.devninja.fr
Scheme: http
IP/Host: docker0 ip address
Port: 8097
Check the "Enabled" checkbox.
By filling in the form in this way, we’re telling Nginx Proxy Manager to route traffic coming from www.devninja.fr to the WordPress container running on port 8097 of the docker0 IP address.
Once you’ve filled in the form, click on the “Save” button. Your proxy host should now be up and running. And traffic coming to www.devninja.fr will be routed to the wordpress container.

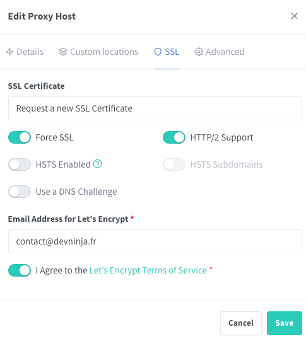
Setup SSL
Additionally, one of the best features of Nginx Proxy Manager is its ability to generate free SSL certificates from Let’s Encrypt. This allows us to secure our websites and protect our users’ data by encrypting all traffic between their web browsers and our server.
Just head to the SSL Tab and request an SSL Certificate.
This process is easy and automated, you don’t need to deal with openssl or certbot, Nginx Proxy Manager will take care of it for you.
Please note that in order to get a certificate from LetsEncrypt, your domain must have a valid DNS A entry pointing to the server public IP address.
Voilà! Thank you for reading this guide on setting up Nginx Proxy Manager.
Enjoy free and secure browsing!