This article is intended to guide DevOps engineers through the process of installing TeamCity in a server with Docker pre-installed. Further, we will create a pipeline to build a Docker image for a .NET 6+ applications and push the image to the Amazon Elastic Container Registry (ECR).

What is TeamCity?
Being a big fan of JetBrains IDEs, I’ve always appreciated their well-crafted tools, and TeamCity, JetBrains’ own CI/CD server solution, is no exception. TeamCity is not only intuitive and easy to navigate, but it’s also completely free for on-premise usage.
When developers talk about CI/CD tools, Jenkins often enters the conversation. It’s an established tool that has served its purpose well over time. However, TeamCity often outperforms Jenkins with its simplicity and efficiency.
TeamCity’s winning feature is its ease of setup and use. It replaces the often complicated plugin integrations associated with Jenkins, with a smooth out-of-the-box experience.
Installing TeamCity
In order to set up TeamCity, we’ll use Docker to run the TeamCity Server. The command below will create a new container with the TeamCity server.
docker run \
-v team_city_data:/data/teamcity_server/datadir \
-v team_city_logs:/opt/teamcity/logs \
-p 8110:8111 \
--name teamcity-server-instance jetbrains/teamcity-server
This command does a few important things:
-v team_city_data:/data/teamcity_server/datadirand-v team_city_logs:/opt/teamcity/logscreates volumes for data persistence. This means your TeamCity data (like build configurations and build results) and logs will be stored on your host machine and won’t disappear when the container is stopped or deleted.-p 8110:8111maps port 8110 on your host machine to port 8111 in the container. This allows you to access the TeamCity server by visitinghttp://localhost:8110 on your web browser.
If you’re looking to make TeamCity available beyond your local network, you can leverage a reverse proxy. This will redirect incoming traffic to your TeamCity container, and, as a bonus, you can secure this external communication by obtaining a free SSL certificate from Let’s Encrypt. See my article about Nginx Proxy Manager
Your TeamCity server should now be running and accessible at http://localhost:8110.

As you continue with the setup, you’ll be guided through the process of creating your initial administrative user. During this process, you’ll encounter an option to use an external database. Given that Docker is already installed on your server, it’s advisable to have a database running in your environment too, if one isn’t already in place.
Quick note: if you’ve set up external access, there’s an extra step you need to take. You’ll have to update the server URL. To do this, head over to ‘Administration’—you’ll find this in the upper right corner of the interface. Under the ‘Server Administration’ section, select ‘Global Settings’. In this menu, update the ‘Server URL’ to match your domain. For example, you might change ‘http://localhost:8111’ to ‘https://teamcity.mydomain.com:443’.
Connecting TeamCity to GitHub (Optional)
This next step isn’t mandatory, but for those of us who rely heavily on GitHub, it can be extremely convenient to connect our fresh TeamCity installation to GitHub. Keep in mind that to do this, TeamCity needs to be externally accessible—that means having both a domain name and SSL certificate.
First, navigate to ‘Administration’ in TeamCity. From there, go to ‘<Root Project>’. (If you’re in the process of creating a new project, you can also click on the small GitHub icon.)
Next, head over to the ‘Connections’ section and click on ‘Add a new Connection’. In the type selection, choose ‘GitHub.com’ (not ‘GitHub App’).
After you’ve done this, TeamCity will provide you with a ‘Homepage URL’ and ‘CallBack URL’. You’ll need to obtain the ‘Client ID’ and ‘Client Secret’ from GitHub.

Next up, head over to GitHub. Log into your account and navigate to ‘Developer Settings’. Here, you’ll need to ‘Create a new OAuth App’. GitHub will ask for a ‘HomeURL’ and a ‘CallBack URL’—use the ones provided by TeamCity in the previous step.

Upon creation of the new OAuth App, GitHub will generate a ‘Client ID’ and ‘Client Secret’. Take these credentials and input them back into TeamCity. And just like that, you’ve successfully connected TeamCity with GitHub.

Creating First Project
Great, now we’re ready to bring your first project to life in TeamCity. Click the ‘+’ button to get started. Thanks to our successful link-up with GitHub, you’ll see a list of all your available repositories from which you can choose.
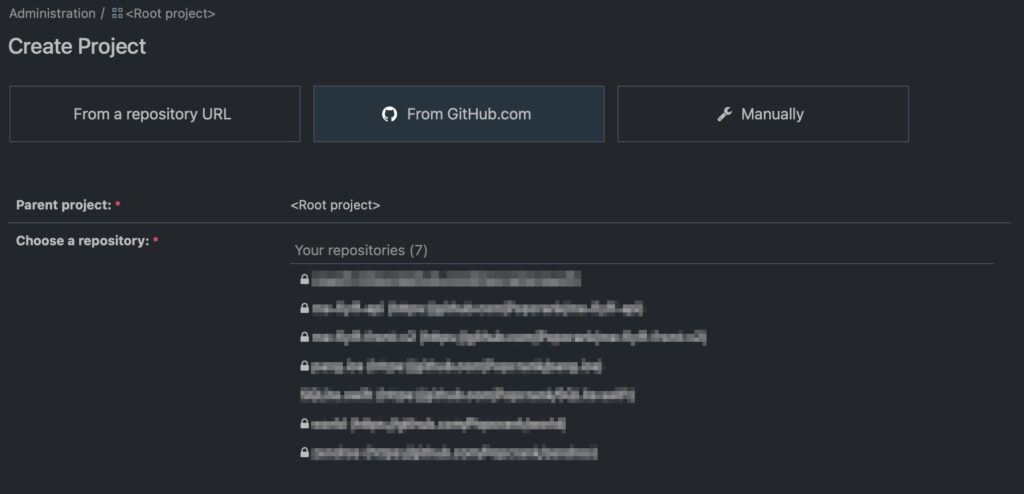
Go ahead and select your desired repository. As you continue through the process, you’ll be prompted to choose a branch. The beauty of TeamCity is that it will automatically identify the available build steps for you—no heavy lifting required on your part.

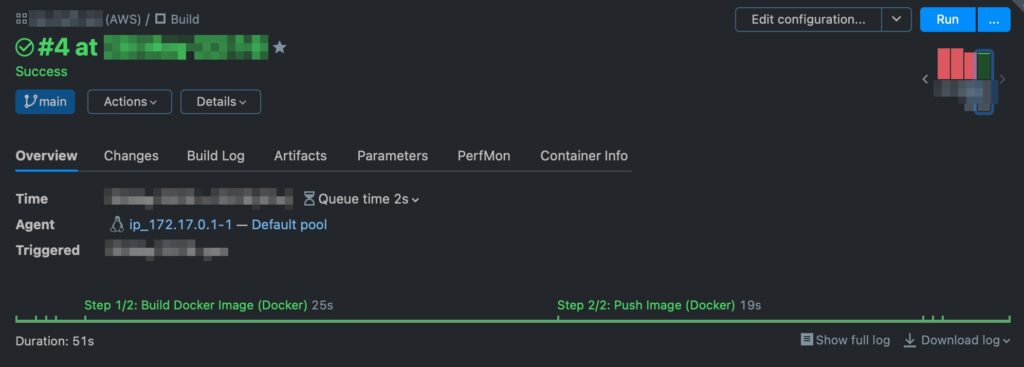
Next, select ‘Docker’ and proceed further. You’ll note that the path to the Dockerfile has been automatically determined for you. But as we’re intending to push our Docker image to Amazon’s Elastic Container Registry (ECR), it’s crucial to ensure the image name aligns with ECR conventions. This is an important step because, without it, the system would default to DockerHub instead. Save.

Connecting to Amazon ECR
To be able to push to Amazon’s ECR, we need to establish a project-level connection to Amazon’s ECR in TeamCity. This requires having Access Tokens from Amazon’s Identity and Access Management (IAM). If you haven’t yet done so, go ahead and create a new user within IAM (ensure that the user is located in the same geographic region as your ECR). The user should be given full access to ECR. As a result, you will receive an Access Key ID and Secret Key. The Client ID can be found in your ECR panel (it’s a digit-only ID that appears as a prefix in your repository URL).
With these details in hand, go to TeamCity and navigate to ‘General Settings’ within your project. From there, proceed to ‘Connections’. Add a new connection to Amazon ECR, input the required details, and test the connection.

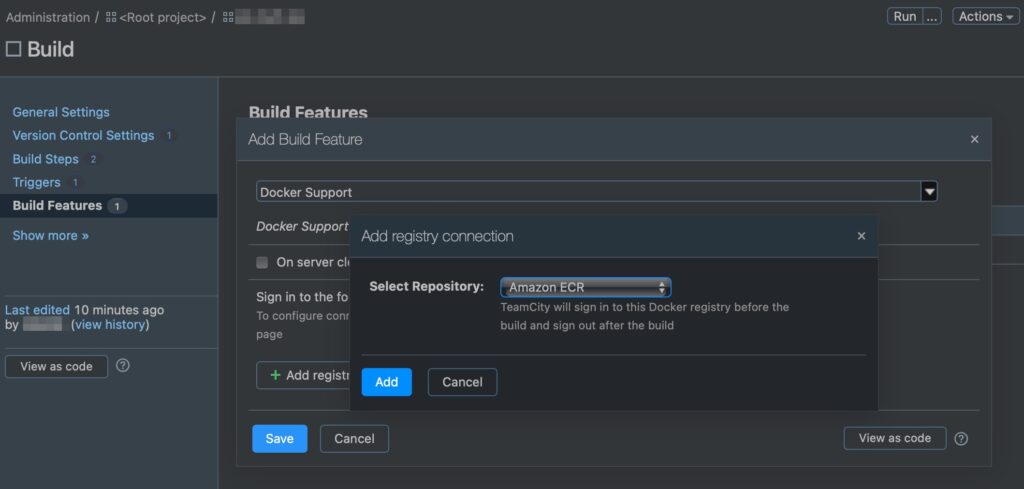
To enable the push to ECR, we must activate a feature in TeamCity called ‘Docker Support’. To do this, navigate to ‘Build Features’ within your project settings. Here, click on ‘Add new Build Feature’ and select ‘Docker Support’ from the list. Make sure to choose ‘Amazon ECR’ as your Repository. This crucial step ensures that Docker images are properly pushed to the correct repository in ECR.
Add Push Step
The final step in setting up your TeamCity pipeline is to add a new build step. When configuring this step, select ‘push’ as the Docker Command in the radio button options. It’s essential here to ensure that the image name aligns with your Amazon ECR naming conventions.

Installing Agents
Now that we have our project set up in TeamCity, it’s time to create an agent on the server. This agent will be responsible for running the builds. We’ll use Docker once again to pull the TeamCity agent image and install it. Here’s the command you need to run (replace IP and Port):
docker run -e SERVER_URL="http://172.17.0.1:8110" \
-v team_city_agent_config_docker:/data/teamcity_agent/conf \
-v /var/run/docker.sock:/var/run/docker.sock \
-v /usr/local/bin/docker:/usr/local/bin/docker \
-d jetbrains/teamcity-agent
This command includes a few important settings:
-e SERVER_URL="http://172.17.0.1:8110”sets the URL of the TeamCity server.172.17.0.1is the IP address of thedocker0network interface, and8110is the port that the TeamCity server listens on.- The
-voptions mount the necessary volumes to allow the agent to run Docker commands.
Navigate to the ‘Agent’ section, which you’ll find in the upper left part of the TeamCity interface. From there, you’ll need to authorize your newly created agent.

Wrapping Up
And there you have it! We’ve walked through the process of installing TeamCity on a server with Docker, creating a CI/CD pipeline for a .NET 6+/C# web application, and setting up an agent to perform our builds. Along the way, we’ve covered the integration of TeamCity with GitHub and the configuration necessary to push Docker images to AWS ECR.
While TeamCity shines with its out-of-the-box simplicity and impressive integration capabilities, its power really comes to the fore when you start to customize it to your specific use case, like we did in this tutorial.